Improving your home’s insulation is a great way to save money and make your home more comfortable — all while reducing your carbon footprint. But it’s not as straightforward as other energy efficiency projects like installing LED lights.
In this guide we’ll cover everything you need to know before upgrading your insulation. To find out how much you can save by upgrading your insulation or see an estimate of how much it will cost based on where you live, check out our guide to saving money and energy by insulating your home.
How does home insulation work?
Insulating your home helps regulate the temperature: it prevents heat loss (during the winter) and heat gain (during the summer).
Most of the heat loss in your home is from conduction, the flow of heat through solid materials. Think about the last time you touched the inside part of a window during winter: it was cold even though you were heating the air around it. That’s an example of conduction.
Conduction makes the heat flow from the inside part of the window to the outside extremely fast, cooling the window and the area around it.
Insulation limits this flow of heat. It traps the heat in the walls, floors, attic, or wherever you have insulation installed, slowing the rate at which it goes outside—and allowing you to save energy.
Insulation in your roof or attic also uses convection (the flow of heat through the movement of air) by stopping or limiting the chimney effect.
The chimney effect is a phenomenon where, in cold weather, hot air rises and escapes out of your under-insulated or unsealed roof. As hot air leaks from the top, it leads to lower pressure within the home compared to outside. The pressure change means cold air is sucked in from the ground floor. So you’re constantly having to heat new air and losing the air you already heated. By insulating your roof and attic you can decrease or even eliminate this source of heat loss.
Types of insulation
The most common type of insulation is the type which protects against conduction. It basically works by trapping heat inside it so it can’t escape.
Here are the most common types of insulation, each of which performs a different role:
Roll insulation
- Insulation material: Glass fibers in wide, puffy sheets, with or without a paper or aluminum face
- Location: Best for long, unobstructed spaces like over attic joists
- Use: Stops heat loss into your attic and walls via conduction
Batt insulation
- Insulation material: Glass fibers in puffy strips, with or without a paper or aluminum face
- Location: Attics, walls, and between crawl space joists
- Use: Stops heat loss into your attic and walls via conduction
Blown-in insulation
- Insulation material: Loose cellulose or fiberglass that’s blown into attics
- Location: Attics and some walls where there’s no existing insulation
- Use: Loose insulation fills in around odd shapes and cavities to help with conduction and convection
Spray foam insulation
- Insulation material: Expanding foam enlarges as it cures; other types cure in the shape they’re sprayed
- Location: Where pipe or wires enter a house and around windows where batting can’t reach
- Use: Plugs hard-to-fill gaps, preventing conduction and convection heat loss
Rigid foam insulation
- Insulation material: Sheets of extruded or expanded polystyrene
- Location: Tucked between joists above the basement or crawlspace
- Use: Foam boards insulate while providing a partial vapor barrier
Specialty insulation
- Insulation material: Pipe insulation, duct insulation and water heater jackets
- Location: Around objects that store or distribute hot water and indoor air
- Use: Keeps water hot; insulates ducts that pass through cold attics
How to tell if you have insulation
It’s possible you don’t even know if you have insulation. The only way to know for sure—and to figure out what kind of insulation you have—is to look for it. Use the table below (courtesy of the Oak Ridge National Laboratory) to know what you’re looking at.
| What you see | What it probably is |
| Loose lightly-packed yellow, pink, or white fibers | Fiberglass |
| Loose densely-packed gray or near-white fibers | Rock wool |
| Loose gray or near-white fibers (like newspaper) | Cellulose |
| Light granules | Vermiculite or perlite |
| Yellow, pink, or white fibers in a squarish shape | Fiberglass batting |
| Hardened foam | Spray polyurethane foam |
How to check for roof or attic insulation
Your home almost certainly has some existing insulation in the attic. It’s easy to check because it’s normally just out in the open. Go (or peek) into your attic and take a look.
If you have access to the ducts in your roof or attic, you should also check those for insulation. Ducts move air around your home, and if they’re not insulated, you’ll never be able to get the full power from your AC or heater. An insulated duct will have a squishy reflective wrapping around it.
How to check for wall insulation
It’s not obvious how to look inside a wall. Generally, it’s recommended that you take the cover plate off an outlet and peek in there with a flashlight—just be sure to turn off the power to the associated outlets first.
If you see any fibers or foams inside, you have insulation for that part of the wall. Keep in mind that some walls might have insulation while others don’t, so you’ll want to check all external walls and the wall connecting your home to the garage (or other areas where you don’t control the temperature).
How to check for floor or crawl space insulation
If you’re able to check under your floors for insulation (by pulling up a floorboard, for example), you’ll be looking for the same fibers or foams. If you have a crawl space with ducts under your home, check those too.
How much insulation do I need?
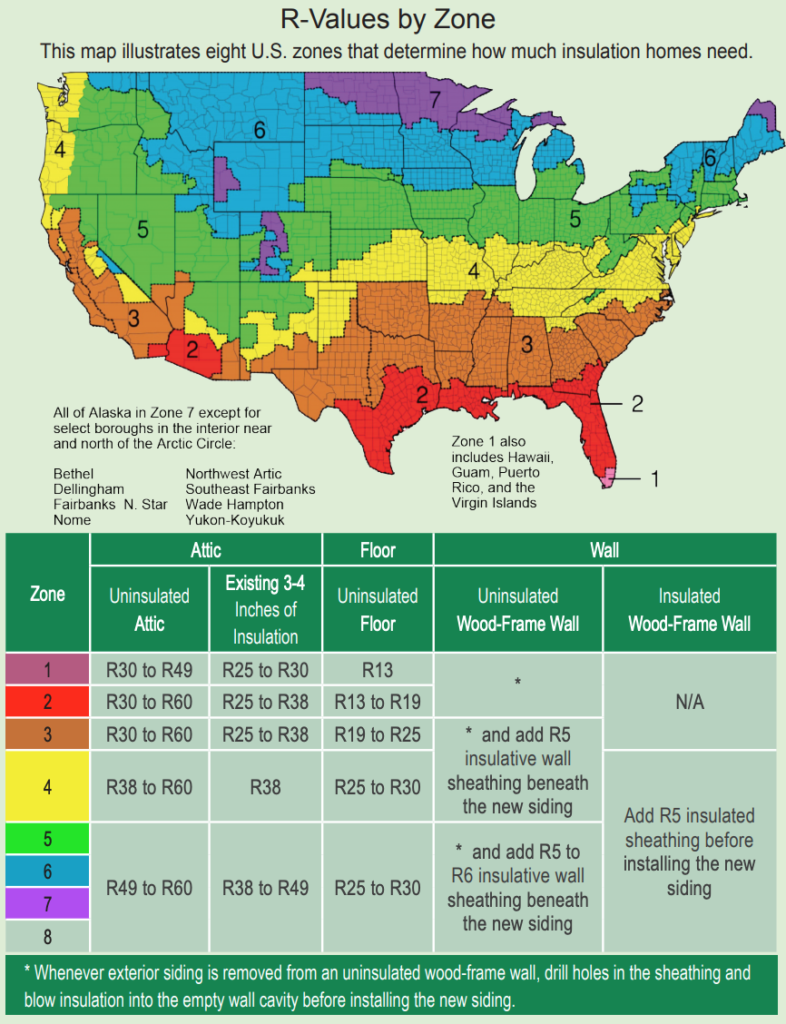
Depending on what part of your home you’re insulating and what climate you live in, you’ll need different amounts and types of insulation. For starters, you’ll need to calculate the total R-value of your insulation: that’s a measurement of how easily heat will move through the material.
To get the R-value, you’ll have to measure the depth of the existing insulation in inches and use the formulas in the insulation R-value chart below.
| Type of insulation | Total R-value |
| Loose-fill fiberglass | 2.5 * depth in inches |
| Perlite or vermiculite | 2.7 * depth in inches |
| Loose-fill rock wool | 2.8 * depth in inches |
| Fiberglass blanket or ball | 3.2 * depth in inches |
| Loose-fill cellulose | 3.5 * depth in inches |
| High performance fiberglass blanket or ball | 3.8 * depth in inches |
| Expanded polystyrene board | 3.8 * depth in inches |
| Extruded polystyrene board | 4.8 * depth in inches |
| Polyisocyanurate board, unfaced | 5.8 * depth in inches |
| Spray polyurethane foam | 5.9 * depth in inches |
| Polyisocyanurate board, foil-faced | 7 * depth in inches |
Once you have that information, use this map and table from the Department of Energy that shows the suggested R-value for insulation based on your climate.

How to insulate: hire or DIY?
You can install insulation on your own, but it’s not simple—or particularly safe. Many types of insulation are irritants to human skin (such as fiberglass), and others can cause dangerous vapors to form when they’re installed (such as polyurethane foam). You might run into asbestos, and incorrectly installed insulation can be a fire hazard and actually decrease air quality in your home.
If you’re somehow still excited to try it yourself, make sure you have personal protective equipment (PPE), including gloves, masks, and even respirators. For more guidance, here’s a guide from EnergyStar and another from the Insulation Institute.
If you plan to hire a contractor, check with your local utility or government—they might have existing programs to help homeowners find quality contractors, and they may even cover part of the cost of installing insulation.
Learn how else you can save energy
We’re on a mission to help homeowners dramatically reduce the amount of energy they use. If your interested in saving money and doing something good for the planet in the process, check out one of our other guides:
